:max_bytes(150000):strip_icc()/spruce-crafts-header-illo-1fcc1cb416554246b2063d9fe26fb24f.png)
How to Make Melt and Pour Soap
:max_bytes(150000):strip_icc()/140916_DFHeadshots_2000.1-58adf9193df78c345b05c72f.jpg)
:max_bytes(150000):strip_icc()/ScreenShot2020-04-01at4.04.38PM-7125ebacd5f24a0c8dd9402c0c80800e.png)
Candle and Soap
Melt and pour soap making is a fun, inexpensive, easy way to get started making soap. Some people move on from melt and pour to cold process soap making, but many are just fine with the ease and safety of melt and pour soap. In this project, you can get creative by choosing interesting molds or blending fragrances together.
Watch Now: 3 Ways to Make Your Own Soap
Assemble all of your ingredients, materials, and equipment. Also, be sure to have a pad of paper or notebook handy to write down any notes or changes you make to the recipe. Be sure that the fragrance oil you choose is not irritating to you or anyone who will be using it, and do the same for the soap-safe dyes.
What You'll Need
Equipment / Tools
- 1 Scale
- 1 Cutting board
- 1 Set of measuring spoons
- 1 Metal whisk
- 1 Large knife
- 1 Rubber spatula
- 1 Ramekin for fragrance oil
- 1 Soap mold that makes 6, 5-ounce bars of soap
- 1 Large glass liquid measuring cup
Materials
- 1 Fragrance oil
- 2 Soap-safe dyes (red and blue)
- 1 Rubbing alcohol in spray bottle
- Paper towels
- 1 Melt and pour soap base
Instructions
-
Cut and Weigh the Melt and Pour Soap Base
Place the glass measuring cup on the scale and zero out the weight.
Cut the melt and pour soap base into small chunks and place them into the container until you've got the amount that your mold will hold. A few tenths of an ounce under or over will not matter.
![Cutting and weighing the soap Base]()
David Fisher / The Spruce -
Melt the Soap Base in the Microwave
Cover the container with plastic wrap. This will help keep the soap base from drying out as it is being heated.
Heat the soap in the microwave, starting with just a minute at a time. Remove the soap and stir it. (It will be thick and chunky.) Repeat heating the soap base a minute or so at a time until all the chunks are gone, and the soap is completely melted.
These two pounds of soap base took about four minutes to melt completely, but your soap base and microwave may differ.
If you prefer not to use a microwave, the soap base can be melted in a double boiler.
Most soap bases will be about 150 degrees when completely melted, so handle with care to avoid any burns.
![Melt the soap base in a microwave oven]()
David Fisher / The Spruce -
Add Fragrance or Essential Oil
While the soap is heating, put your fragrance ramekin onto the scale and zero out the weight. Measure your fragrance or essential oil into the ramekin. A good starting place is 0.4-ounces of fragrance per pound of soap. (Generally, you can use about 2 to 3 percent per weight of the soap.) You can go up or down from there if you're using a light or strong fragrance oil.
Plain lavender essential oil at about 0.4-ounce per pound is what was used in this example. (A total of 0.8-ounce for the two-pound batch.)
Once you've measured your fragrance and removed the soap from the microwave, slowly add the fragrance to the melted soap base and gently stir.
![Adding the fragrance to the soap]()
David Fisher / The Spruce -
Add Color
If you want to add some color to your soap, (you don't have to, it's purely aesthetic,) make sure you use soap/skin-safe dyes, micas or natural colorants.
Also, be aware that soap-safe dyes are much weaker than candle dyes. You will need to use more than you would in the same amount of wax.
To achieve an indigo color, combine red and blue soap-safe dyes (about 10 drops each).
![Adding the color to the soap]()
David Fisher / The Spruce -
Stir the Melted Soap
Gently stir the melted soap to completely incorporate the fragrance and color.
Don't stir too hard or you'll get bubbles in the soap.
If you do get bubbles, a light spritz of rubbing alcohol from a spray bottle gets rid of them.
![Stirring the soap base]()
David Fisher / The Spruce -
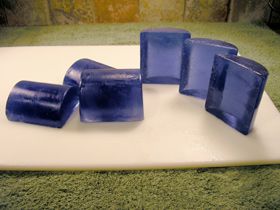
Pour the Melted, Colored, Fragranced Soap Into the Mold
Slowly pour the soap into the mold.
Try not to splash the soap and, once again, you want to avoid bubbles if possible.
You're done for now. Carefully move the mold to a safe place, cover with plastic wrap, and start cleaning up.
The soap should be hard enough to unmold in a few hours. You can hurry this along by putting the mold in the refrigerator, but don't put it into the freezer.
It will take several hours on the counter or approximately an hour in the refrigerator for the soap to completely cool and harden.
![Pouring the soap into the mold]()
David Fisher / The Spruce -
Unmold the Soap
While you're waiting for the soap to harden, write your results in your notebook. Record details like how many drops of color you used, the amount of fragrance you added, how much base you had leftover, etc. These notes will help you duplicate the results next time, or help you remember to avoid any mistakes you made.
When the soap is completely hardened, you should be able to pop the bars out of the mold. Some molds release easily but others may be more difficult. Tapping the mold firmly with the palm of your hand or a large spoon sometimes helps.
For a persistent bar, you can turn the mold over and run hot water over the back of it. The soap should fall easily out of the mold.
You can rub off or trim off any imperfections with a cloth or small knife.
Since the melt and pour soap base is already cured, there's no waiting. You can use your soap right away.
:max_bytes(150000):strip_icc()/mpweighcut1-56a0e6eb5f9b58eba4b4fd57.jpg)
:max_bytes(150000):strip_icc()/mpmelt1-56a0e6ec5f9b58eba4b4fd62.jpg)
:max_bytes(150000):strip_icc()/mpfragrance1-56a0e6ec5f9b58eba4b4fd66.jpg)
:max_bytes(150000):strip_icc()/mpcolor1-56a0e6ec3df78cafdaa63446.jpg)
:max_bytes(150000):strip_icc()/mpstir1-56a0e6eb3df78cafdaa6343d.jpg)
:max_bytes(150000):strip_icc()/mppour1-56a0e6ec5f9b58eba4b4fd5f.jpg)
:max_bytes(150000):strip_icc()/TheBestOnlineSoapMakingClassesof2022-bd887573d7b74a0f9bd846d5891f098f.jpg)
:max_bytes(150000):strip_icc()/CoolWaterMP-B6-56a0e9a35f9b58eba4b51bc8.jpg)
:max_bytes(150000):strip_icc()/LoofahSoap-5a74eb34c064710037056333.jpg)
:max_bytes(150000):strip_icc()/LipBalm15-2106fcb4a1804d6580cb4c0c9b45eba3.jpg)
:max_bytes(150000):strip_icc()/SPR_517084-how-to-make-soap-5acf73dfc6733500372cbb73.png)
:max_bytes(150000):strip_icc()/various-soap-bars-1208483325-7f2762cada5649b0b30880a473909a91.jpg)
:max_bytes(150000):strip_icc()/handmade-soap--spa-and-body-care-concept--wellness-1130421175-790951b5c6a6437d8bee724275cd45e1.jpg)
:max_bytes(150000):strip_icc()/stacks-homemade-organic-bars-of-soap-with-lavender-on-top-169946754-8a206ddfe44f43caac4ba1eef935b58e.jpg)
:max_bytes(150000):strip_icc()/doginbath-GK-Hart-Vikki-Hart-58adf9785f9b58a3c9fadf98.jpg)
:max_bytes(150000):strip_icc()/double_soap_end_image_II-5ace1f1aae9ab80036d56de1.jpg)
:max_bytes(150000):strip_icc()/GettyImages-667610257-590b93453df78c9283dc370c.jpg)
:max_bytes(150000):strip_icc()/fouroilsoap-590b8d4a5f9b586470c9cb17.jpg)
:max_bytes(150000):strip_icc()/handmade-natural-olive-oil-soap-bars-diy-homemade-soap-with-lavender-essentail-oils---activity-for-what-to-do-inside-at-home--top-view-on-decorative-background--1269532850-48950238936e4353b4e774b2469bd577.jpg)
:max_bytes(150000):strip_icc()/GettyImages-702542841-5a59476eaad52b003762d42c.jpg)
:max_bytes(150000):strip_icc()/Handcrafted-soap-GettyImages-158681876-58f7ea023df78ca1598b98ad.jpg)
:max_bytes(150000):strip_icc()/soaps-with-herbs-185078652-58adfb1f5f9b58a3c9ff1d4a.jpg)